HOW TO DO INTERIOR FINISHES
There are many ways of doing interior finishes just as there are many ways of doing other things in Revit but the most efficient way of doing interior finishes in Revit will be explained here. Our breakdown starts off with the creation of walls. As many Revit users know, wall composition includes multiple layers to show full wall structure, materials but this is an efficient way for doing interior finishes. The efficient way is to draw walls for finishes. So if we make a do-list;1. Draw thin walls and floors
The thickness of such walls usually is 1/2” which is equivalent to 12.7mm, we can take 12mm or even 10 if you’re modeling in metric units. The same applies to floors, you can make it 1/2” but don’t forget to edit elevation, otherwise it will be overlapping with the structural floor. This might cause a little difference in ceiling height if you do interior elevations but that’s the case I’d suggest you hide them. Though, this is another discussion. So, set the offset of the floor above the same thickness which is 1/2” in our case.

Don’t forget to join the thin wall with the existing wall so that the doors and windows such elements won’t be blocked, Revit automatically makes those openings when you join the walls.
2. Use default materials or create new ones to assign
Go to the Manage tab and click on the material browser. Here you can create new materials. Select, create and then name it and give it a desired material texture. Don’t forget to edit the identity part, give it a mark, name it so that material tags will pick up this info. Also, make sure you gave the proper surface pattern.

Do this same process for each material, once the materials are ready you can proceed to assign them to the walls and floors. It’s just like painting a house. The same principle is the most efficient way in Revit.
3. Assing material finishes using the paint tool
As stated above painting the walls is a more efficient way than giving walls a material because that way you need to duplicate the wall for each finish type. The same applies to floors to avoid many duplicated new floors.

4. Use split face tool to assign multiple textures to a single face
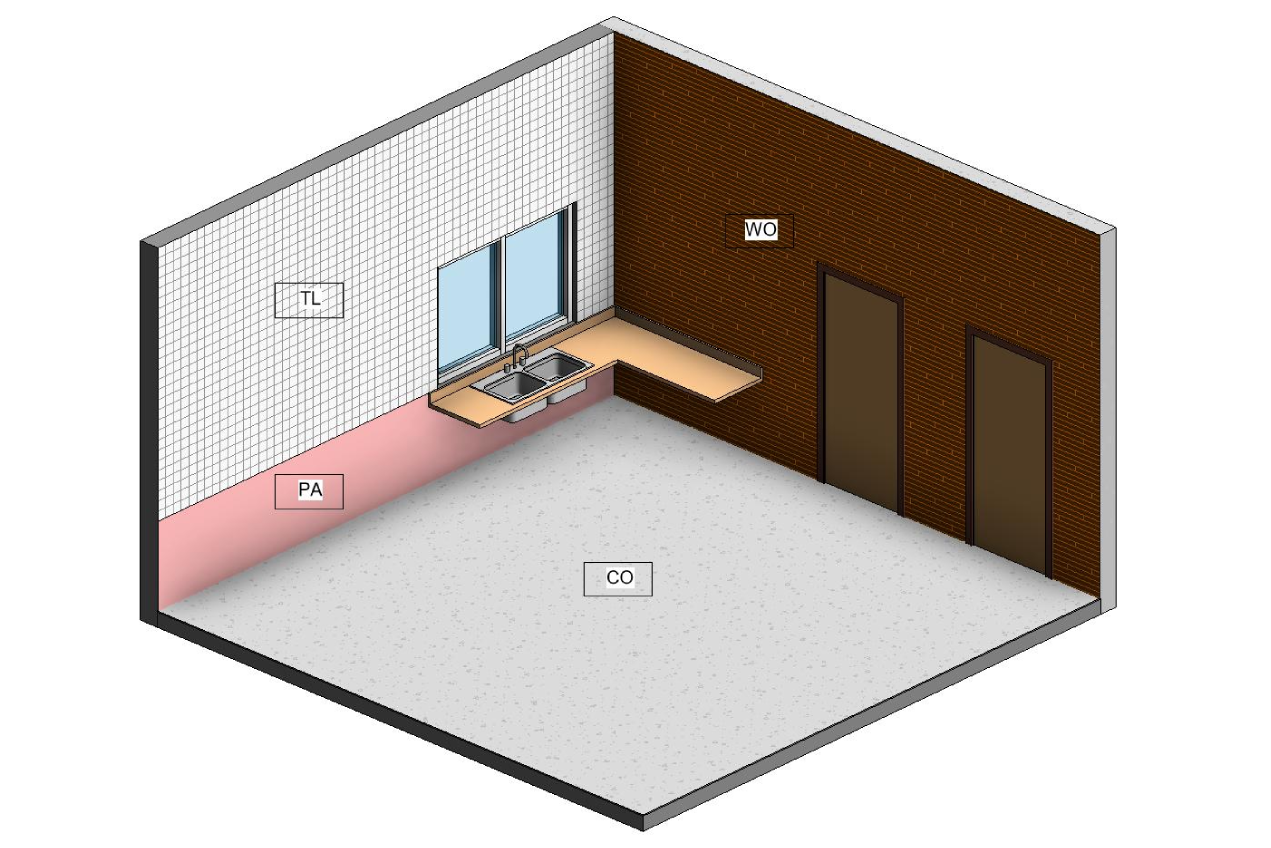
This is a very useful tool if you want to give multiple patterns to a wall face. You can split the wall however you like. I just drew a linear line though. I gave ceramic look above the sink and a regular painting below. I also assigned wood and concrete textures. They are just random pics just to have more colorful patterns on the screen.

After these steps, you should have a similar model in 3d view. Now it’s time to tag your materials, and for that, we gonna use the material tag under the annotation tab.
5. Use/edit the default material tag or create a new one
Well, there are two options in this case;
- Create a new material tag based on a material tag template
- You can edit the current material tag family
For this example, we can go with the second option. Go to Project Browser and under Annotation Symbols find the material tag and right click and edit. In the family window, you can add lines, symbols and also edit label parameters. You need to change it to Mark for this example because we gave mark values for materials we created under their identity tab. This doesn’t have to be a mark though.

After you imported back the material tag family you can simply click on surfaces and tag them. If you want to tag finishes in 3d view you need to lock the orientation of 3d view, see where it is on the next image. Now it’s time to create schedules, for that we need material takeoffs.
6. Create schedules using material takeoff
You created interior finishes but now you want to show them to your client’s and the best way to do that is to create schedules. To do that, you need to go under view and click on schedules. Under the drop-down menu click on material takeoffs. In the prompted window you can edit a few things but we gonna go with defaults and create multi-category material takeoff.

After you click ok, you’ll be prompted to the material takeoff properties panel. Here we gonna do a bunch of things, first of all, you need to select the things you wanna list on your schedules. Move the material ones you wanna see such as name and area, description, keynote so on to the right under schedules fields. You need to select the mark as well because we identified materials by that. Note that this was an optional selection, it could be the type comment or some other thing as well. After you select these things we gonna go to the filter tab and the reason we do this is because if don’t apply the filter all of the materials will be shown on your material schedule. There are numbers of different things you can filter the materials by but since we named all of them to finish we can filter them by that so that only the ones named as the finish will show up on our list. Again, this was optional. For instance, if you wrote ”x” as a description for these materials you created then you could filter them by that. Anyway, we continue with the name and we select ‘contains’ because we want to list the materials that have been named or contain the word ‘finish in their name.

Then you go to sorting group and technically you can sort them by anything you added but keynote makes sense then mark. You should uncheck itemize every instance if you don’t wanna have the same material duplicated if there is more than one in the model. There is another option under the formatting tab you can use to hide something for instance you can hide a mark even if you use it to create this schedule.

After this, you can click okay and create your schedule. As stated earlier, the majority of these selections were optional you can adjust them however you like. After these steps, you should have a schedule shown in the image down below. Notice on the left it’s a raw version of the schedule. You can edit the headers and make them look more presentable. See the image on the right.

After this, you can add them to your sheet. There are a few things that you need to keep in mind;
- Since we created a schedule filter from ‘finish’ you can add new materials to your schedule by editing materials names, e. i. if you create a new material name it ‘FINISH’ it’ll appear on your schedule
- Notice some parts on the schedule are empty, you can fill out that information on the legend but I highly recommend you to edit material identity because the schedule takes that information from there. So go you manage-materials, click on the material you want to edit, and go to the identity tab here you can edit everything. e. i. if you add a description it’ll show up on your legend also you can add new types to your schedule for instance if you add a manufacturer name to the material and if you go schedule add a new field, it’ll show up on your schedule. See the next image.

That’s pretty much it. Now you have it.
PLUS
There is a extra tip. aliquet dolor fringilla ornare. Nunc non massa erat. Vivamus odio sem, rhoncus vel bibendum vitae, euismod a urna. Aliquam erat volutpat. Aenean non lorem arcu. Phasellus in neque nulla, sed sodales ipsum. Morbi a massa sed sapien vulputate lacinia.
If you have any questions leave a comment.
References;
Jan 9, Nicolas Catellier 11 TIPS TO CREATE INTERIOR FINISHES IN REVIT
Link; https://revitpure.com/blog/11-tips-to-create-interior-finishes-in-revit